Getting Started with Supabase

What is Supabase?

Supabase gives developers a PostgreSQL database, authentication, instant APIs, real-time subscriptions, storage, and more - all through a unified interface. It’s designed to be easy to use while providing the features and flexibility that developers need.

Useful Resources

Quick-start

Supabase is an open-source Firebase alternative that provides all the backend services you need to build a modern web application. It combines the power of PostgreSQL, a robust relational database, with a suite of developer-friendly tools to help you build scalable applications quickly.

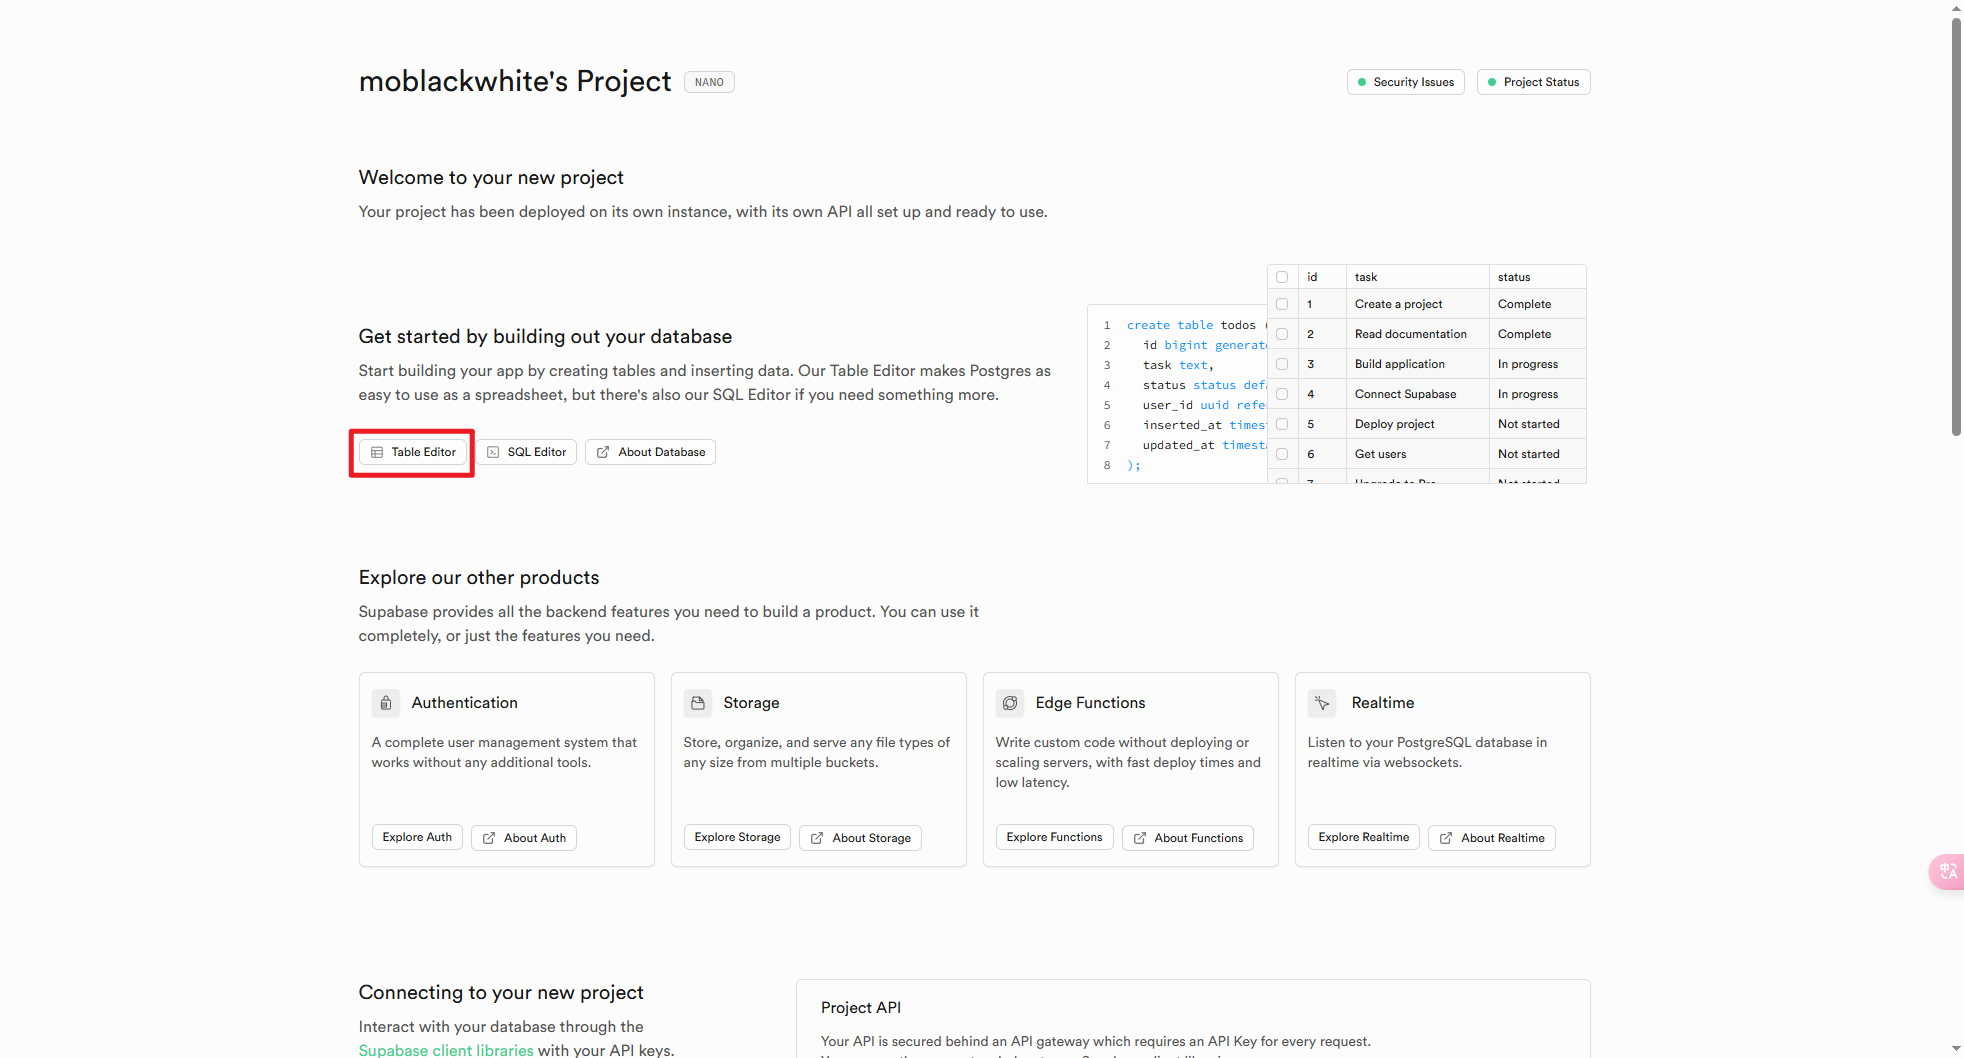
Step 1: Create a Supabase project

Go to database.new and create a new Supabase project.

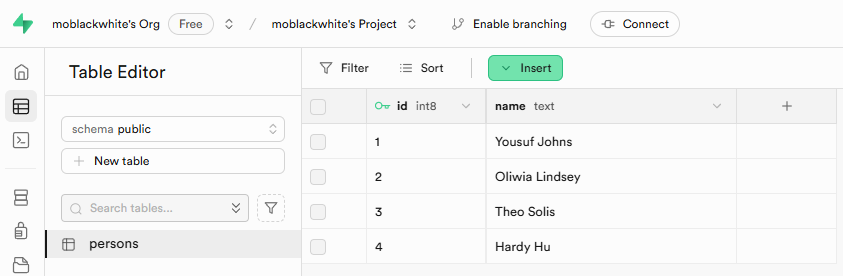
When your projects is up and running, go to the Table Editor,
create a new table and insert some data.

or use SQL Editor.

1
2
3
4
5
6
7
8
9
10
11
12
13
14
-- Create the table
create table persons (
id bigint primary key generated always as identity,
name text not null
);
-- Insert some sample data into the table
insert into persons (name)
values
('Yousuf Johns'),
('Oliwia Lindsey'),
('Theo Solis'),
('Hardy Hu');

alter table persons enable row level security;

Make the data in your table publicly readable by adding an RLS policy.

1
2
3
4
create policy "public can read persons"
on public.persons
for select to anon
using (true);

Step 2: Create a React app

1
pnpm create vite@latest my-app -- --template react

Step 3: Install the Supabase client library

1
pnpm install @supabase/supabase-js

Step 4: Query data from the app

In App.jsx, create a Supabase client using your project URL and public API (anon) key:

1
2
3
4
5
6
7
8
9
10
11
12
13
14
15
16
17
18
19
20
21
22
23
24
25
26
27
import { useEffect, useState } from "react";
import { createClient } from "@supabase/supabase-js";

const supabase = createClient("https://<project>.supabase.co", "<your-anon-key>");

function App() {
const [persons, setPersons] = useState([]);

useEffect(() => {
getPersons();
}, []);

async function getPersons() {
const { data } = await supabase.from("persons").select();
setPersons(data);
}

return (
<ul>
{persons.map((person) => (
<li key={person.name}>{person.name}</li>
))}
</ul>
);
}

export default App;

A Simple Todo App

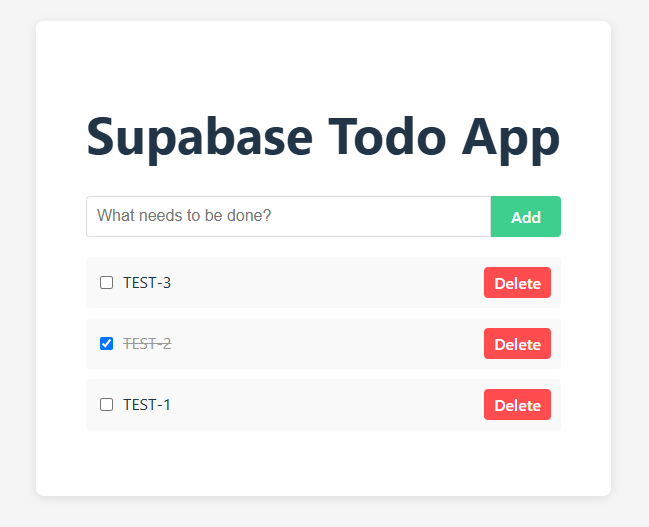
Let’s build a simple todo application to demonstrate how Supabase works in practice.

Step 1: Create a supabase project

1
2
3
4
5
6
7
-- Create the table
CREATE TABLE todos (
id UUID PRIMARY KEY DEFAULT uuid_generate_v4(),
created_at TIMESTAMPTZ DEFAULT now(),
task TEXT NOT NULL,
is_complete BOOLEAN DEFAULT false
);

Step 2: Stetup project

1
pnpm create vite@latest supabase-todo-app --template react

Step 3: Install lib

1
pnpm install @supabase/supabase-js

Step 4: Create a Supabase client

File src/supabaseClient.ts

1
2
3
4
5
6
import { createClient } from '@supabase/supabase-js'

const supabaseUrl = 'YOUR_SUPABASE_URL'
const supabaseAnonKey = 'YOUR_SUPABASE_ANON_KEY'

export const supabase = createClient(supabaseUrl, supabaseAnonKey)

Step 5: Todo App Component

File src/main.jsx

1
2
3
4
5
6
7
8
9
10
11
12
13
14
15
16
17
18
19
20
21
22
23
24
25
26
27
28
29
30
31
32
33
34
35
36
37
38
39
40
41
42
43
44
45
46
47
48
49
50
51
52
53
54
55
56
57
58
59
60
61
62
63
64
65
66
67
68
69
70
71
72
73
74
75
76
77
78
79
80
81
82
83
84
85
86
87
88
89
90
91
92
93
94
95
96
97
98
99
100
101
102
103
104
105
106
107
108
109
110
111
112
113
114
115
116
117
118
119
120
121
122
123
124
125
126
127
128
129
130
131
132
133
134
135
136
137
138
139
140
141
142
143
144
145
146
147
148
149
150
151
152
153
154
155
156
157
158
159
160
161
162
163
164
165
166
167
168
169
170
171
172
173
174
175
176
177
178
179
import './App.css';

import React, { useState, useEffect } from 'react'
import { supabase } from './supabaseClient'
import './App.css'

function App() {
const [todos, setTodos] = useState([])
const [newTaskText, setNewTaskText] = useState('')
const [errorText, setErrorText] = useState('')
const [loading, setLoading] = useState(true)

useEffect(() => {
// Fetch todos when component mounts
fetchTodos()

// Set up real-time subscription
const subscription = supabase
.channel('public:todos')
.on('postgres_changes', { event: '*', schema: 'public', table: 'todos' }, payload => {
console.log('Change received!', payload)
fetchTodos()
})
.subscribe()

// Cleanup subscription when component unmounts
return () => {
subscription.unsubscribe()
}
}, [])

const fetchTodos = async () => {
try {
setLoading(true)

// Query todos from Supabase
const { data, error } = await supabase
.from('todos')
.select('*')
.order('created_at', { ascending: false })

if (error) {
throw error
}

if (data) {
setTodos(data)
}
} catch (error) {
console.error('Error fetching todos:', error)
} finally {
setLoading(false)
}
}

const addTodo = async (e) => {
e.preventDefault()

if (newTaskText.trim() === '') {
setErrorText('Task cannot be empty')
return
}

try {
const { data, error } = await supabase
.from('todos')
.insert([{ task: newTaskText, is_complete: false }])
.select()

if (error) {
throw error
}

// Update the todos state directly with the new todo
if (data && data.length > 0) {
setTodos(prevTodos => [data[0], ...prevTodos])
}

// Clear input field
setNewTaskText('')
setErrorText('')
} catch (error) {
console.error('Error adding todo:', error)
}
}

const toggleTodoCompletion = async (id, is_complete) => {
try {
const { data, error } = await supabase
.from('todos')
.update({ is_complete: !is_complete })
.eq('id', id)
.select()

if (error) {
throw error
}

// Update the todo in state directly
if (data && data.length > 0) {
setTodos(prevTodos =>
prevTodos.map(todo => todo.id === id ? data[0] : todo)
)
}
} catch (error) {
console.error('Error updating todo:', error)
}
}

const deleteTodo = async (id) => {
try {
const { error } = await supabase
.from('todos')
.delete()
.eq('id', id)

if (error) {
throw error
}

// Remove the todo from state directly
setTodos(prevTodos => prevTodos.filter(todo => todo.id !== id))

} catch (error) {
console.error('Error deleting todo:', error)
}
}

return (
<div className="container">
<h1>Supabase Todo App</h1>

<form onSubmit={addTodo} className="todo-form">
<input
type="text"
placeholder="What needs to be done?"
value={newTaskText}
onChange={e => setNewTaskText(e.target.value)}
className="input-task"
/>
<button type="submit" className="button-add">Add</button>
</form>

{errorText && <p className="error">{errorText}</p>}

{loading ? (
<p>Loading todos...</p>
) : (
<ul className="todo-list">
{todos.length ? (
todos.map(todo => (
<li key={todo.id} className={`todo-item ${todo.is_complete ? 'completed' : ''}`}>
<div className="todo-content">
<input
type="checkbox"
checked={todo.is_complete}
onChange={() => toggleTodoCompletion(todo.id, todo.is_complete)}
/>
<span>{todo.task}</span>
</div>
<button
onClick={() => deleteTodo(todo.id)}
className="button-delete"
>
Delete
</button>
</li>
))
) : (
<p>No todos yet. Add one above!</p>
)}
</ul>
)}
</div>
)
}


export default App;

Step 6. css

File src/App.css

1
2
3
4
5
6
7
8
9
10
11
12
13
14
15
16
17
18
19
20
21
22
23
24
25
26
27
28
29
30
31
32
33
34
35
36
37
38
39
40
41
42
43
44
45
46
47
48
49
50
51
52
53
54
55
56
57
58
59
60
61
62
63
64
65
66
67
68
69
70
71
72
73
74
75
76
77
78
79
80
81
82
83
84
85
86
87
88
89
90
91
92
93
body {
display: flex;
justify-content: center;
align-items: flex-start;
min-height: 100vh;
margin: 0;
padding-top: 40px;
background-color: #f5f5f5;
}

.container {
max-width: 600px;
margin: 0 auto;
padding: 50px;
font-family: -apple-system, BlinkMacSystemFont, 'Segoe UI', Roboto, Oxygen,
Ubuntu, Cantarell, 'Open Sans', 'Helvetica Neue', sans-serif;
background-color: white;
border-radius: 8px;
box-shadow: 0 2px 10px rgba(0, 0, 0, 0.1);
}

.todo-form {
display: flex;
margin-bottom: 20px;
}

.input-task {
flex-grow: 1;
padding: 10px;
border: 1px solid #ddd;
border-radius: 4px 0 0 4px;
font-size: 16px;
}

.button-add {
padding: 10px 20px;
background-color: #3ecf8e;
color: white;
border: none;
border-radius: 0 4px 4px 0;
font-size: 16px;
cursor: pointer;
}

.button-add:hover {
background-color: #2eb67d;
}

.todo-list {
list-style: none;
padding: 0;
}

.todo-item {
display: flex;
justify-content: space-between;
align-items: center;
padding: 10px;
margin-bottom: 10px;
background-color: #f9f9f9;
border-radius: 4px;
}

.todo-item.completed span {
text-decoration: line-through;
color: #999;
}

.todo-content {
display: flex;
align-items: center;
}

.todo-content input {
margin-right: 10px;
}

.button-delete {
background-color: #ff4d4f;
color: white;
border: none;
border-radius: 4px;
padding: 5px 10px;
cursor: pointer;
}

.button-delete:hover {
background-color: #ff7875;
}

.error {
color: #ff4d4f;
}

Key Features

1. PostgreSQL Database

Supabase is built on top of PostgreSQL, one of the world’s most reliable relational databases. This means you get all the power of SQL with extensions like PostGIS for geospatial data, full-text search, and more.

2. Authentication

Supabase provides a full authentication system out of the box. You can easily set up:

  • Email & password authentication
  • Magic link sign-ins
  • Social logins (Google, GitHub, Facebook, etc.)
  • Phone authentication

3. Auto-generated APIs

One of the most powerful features of Supabase is its ability to automatically generate RESTful and GraphQL-like APIs based on your database schema. No need to write backend code for basic CRUD operations.

4. Real-time Subscriptions

Supabase allows you to listen to changes in your database in real-time, making it perfect for building collaborative applications, live dashboards, and chat applications.

5. Storage

Store and serve large files like images, videos, and documents with Supabase Storage, which includes access controls tied to your authentication system.

6. Edge Functions

Write and deploy serverless functions without having to manage infrastructure.

How It Works

Let’s break down the key parts of this example:

  1. Setting up the Supabase client: We initialize a connection to our Supabase project using our URL and anonymous key.

  2. Authentication: While not shown in this basic example, Supabase makes it easy to add user authentication with just a few lines of code.

  3. Database operations: We’re using Supabase’s automatically generated APIs to:

    • Fetch todos with supabase.from('todos').select('*')
    • Add a new todo with supabase.from('todos').insert([{...}])
    • Update a todo with supabase.from('todos').update({...}).eq('id', id)
    • Delete a todo with supabase.from('todos').delete().eq('id', id)
  4. Real-time subscriptions: We set up a subscription to receive real-time updates when the todos table changes, ensuring the UI always displays the latest data.

Beyond the Basics

This simple todo app just scratches the surface of what Supabase can do. You can extend it with:

  • User authentication to make personal todo lists
  • Row-level security to protect user data
  • Storage for file attachments
  • Edge functions for custom server-side logic

Conclusion

Supabase provides a comprehensive backend solution that allows frontend developers to build full-stack applications without having to write and manage complex backend code.

Its open-source nature, PostgreSQL foundation, and developer-friendly tools make it an excellent choice for projects of all sizes.

Whether you’re building a small side project or a large-scale application, Supabase offers the flexibility and features you need to bring your ideas to life quickly.


Getting Started with Supabase
https://www.hardyhu.cn/2024/12/24/Getting-Started-with-Supabase/
Author
John Doe
Posted on
December 25, 2024
Licensed under